The Flagbag and the Mobile School are both StreetSmart tools designed to bring educational activities to children and young people in vulnerable contexts, but they differ in their content and logistical requirements. With the Flagbag, you can choose the flags you need from a selection of 50 flags covering 7 topics, then head to your location and set up and engaging session in a few minutes, both indoors or outdoors. The Flagbag’s lower threshold makes it accessible to smaller organisations with limited logistical resources, allowing to reach target groups in a wider variety of settings. The Mobile School is a larger, vehicle-mounted setup that brings a full educational space on wheels, with over 280 panels and activities, suited for higher-volume outreach and outdoor sessions. Both tools are rooted in the same StreetSmart methodology and can complement each other, our partners can start with the Flagbag and expand their offer over time.
The Flagbag offer includes the full package of 50 educational flags, organised around 7 key topics, along with digital game manuals and a set of practical tools to set up your learning space. As a Flagbag partner, you also get access to our digital resources: StreetSmart Play to find games and activities for your target group, StreetSmart Learn to deepen your team’s knowledge through interactive training programmes, and StreetSmart Impact to track your activities and follow up on your sessions’ progress. StreetSmart invests directly in the production and translation of the materials to your local context, in the transportation costs, and in the full on-site training programme – including content, methodology, facilitators and their travel and accommodation expenses.
StreetSmart Flagbag partners always receive the full package of 50 educational flags. The Flagbag is designed as a complete educational tool, and the variety of topics and activities is what makes it effective across different contexts and groups.
The Flagbag comes as a fixed package and cannot be supplemented with additional flags. The 50 flags cover 7 key topics and are designed to work together as a comprehensive educational offer. You can, however, expand your sessions in a do-it-yourself way by adding your own methods and materials, or by using the activity inspiration on StreetSmart Play.
No, it’s not possible to buy a Flagbag. StreetSmart collaborates with existing local organisations that offer educational activities to children and young people in vulnerable contexts. We work through a selection and partnership procedure to ensure long-term, sustainable use (multiple interventions per week). When a partnership is approved and funding is available, StreetSmart invests directly in the production, delivery and on-site training costs. Our local partners cover the day-to-day operational costs.
Want to help make a Flagbag partnership possible? Individuals, companies and foundations can support us in raising the funding— for example by adopting a Flagbag project—so we can invest in new partnerships and reach more children worldwide.
Yes. To guarantee sustainability and accountability, applications need to come from a registered organisation (legal entity) with the capacity to run the Flagbag on a regular basis (e.g., at least two paid staff members). It’s also important for us to be in direct contact with the youth professionals who will implement the tools with children and young people.
Are you applying as an individual? Feel free to put us in touch with a local organisation that works with children and young people in vulnerable contexts. In the meantime, you can already get started with our free resources in the Toolkit section and explore our digital platforms (StreetSmart Play and StreetSmart Learn) for activities and training.
All the Flagbag partners run at least 100 sessions per year with the Flagbag to guarantee social impact. Local partners are responsible to have paid youth professionals to conduct the sessions. Moreover, all of our partners use our StreetSmart digital tools to plan educational activities, to train their staff and to measure their impact. During the application phase a StreetSmart partnership coordinator will make an evaluation together with the applying organisation, taking into account all these criteria, before making a final decision to start up a partnership. More information on our partnership can be found here.
Do you work for an organisation that’s working with children and young people growing up in vulnerable contexts? Interested in using our street-proof tools and methodologies? Great! Every organisation worldwide working with this target group can become a StreetSmart Flagbag partner. Send us a message to get in touch so we can provide you with all the documents to start your application.
No, it’s not possible to buy a mobile school. StreetSmart always collaborates with existing local partner organisations that are offering educational activities to street-connected young people. We believe in sustainable partnerships with organisations that are conducting multiple interventions per week with our tools. That’s why we always stick to our partnership procedure as described here. Once a partnership is approved, StreetSmart invests directly in the costs of the educational materials and the trainings on-site. Our partners are responsible for the daily operational costs and the one-time clearance costs. For more detailed information, check out our pricing model or send us a message!
Yes, in order to guarantee sustainability, StreetSmart always partners with existing local organisations with at least two paid staff members. You’re an individual and you’re inspired by the idea of StreetSmart Wheels? Don’t hesitate to put us in touch with local organisations that are conducting educational activities with young people.
Yes, in order to guarantee sustainability, StreetSmart always partners with existing local organisations with at least two paid staff members. You’re an individual and you’re inspired by the idea of StreetSmart Wheels? Don’t hesitate to put us in touch with local organisations that are conducting educational activities with young people.
All the StreetSmart Wheels partners are organisations that run at least 4 interventions per week with the mobile school to guarantee social impact. Local partners are responsible to have paid street educators, resources to transport the materials to and from the intervention areas and safe storage. Moreover, all of our partners use our StreetSmart digital tools to plan educational activities, to train their staff and to measure their impact. During the application phase and the exploratory expedition, a StreetSmart facilitator will make an evaluation together with the applying organisation, taking into account all these criteria, before making a final decision to start up a StreetSmart Wheels partnership. More information on our partnerships can be found here.
StreetSmart does not send volunteers to partners abroad. Our local partners are independent organisations with their own criteria and policies regarding volunteers. However, people who are inspired by our story and want to volunteer, can join our volunteer groups in Belgium. Contact us for more information!
Do you work for an organisation that’s working with street-connected young people? Interested in using our street-proof tools and methodologies? Great! Every organisation worldwide working with this target group can become a StreetSmart Wheels partner. Send us a message to get in touch so we can provide you with all the documents to start your application!
The StreetSmart Wheels network is constantly growing! Check out the StreetSmart Wheels product page to get an overview of our active partner organisations.
MobileSchool.org has a large number of volunteers who use their individual talents to contribute to the mission of the organisation. Organising campaigns, developing new educational materials or translating documents … our volunteers are superstars! Interested in joining this dynamic group of people. Don’t hesitate to send us a message! Besides volunteering, you can support us by donating. Your donation will be used to increase our impact on street-connected children worldwide.
No, StreetSmart Wheels is an integrated outreach approach, a combination of a mobile school, printed educational materials, training & coaching and the StreetSmart Impact and Play digital tools. If you’re interested in educational materials, go to our StreetSmart Play platform, make an account, and find hundreds of educational games you can use for free!
For StreetSmart, it is crucial children in all countries can relate to the educational panels. That’s why all our materials are always translated into the dominant local language before starting up a new StreetSmart Wheels project. Moreover, cultural adaptations are made depending on the continent and region where the local partner will use the materials to ensure the highest possible impact on the streets.
The mobile school carts are produced by the teachers and students of the Provincial Secondary School in Bilzen (PSSB). This way, the students have a direct impact on street-connected young people worldwide. Learn more about the school and their production site in this video.
Thanks to our 360° impact model, our business venture StreetwiZe invests its profits into the social projects of StreetSmart. Besides this, we can count on the support of our partners and private donations. For more information about the model, visit the ‘Our impact’ page. More information about donations, visit the MobileSchool.org donation page.
Each toolkit includes a combination of educational posters, games and activities, downloadable manuals, online training programmes, and sometimes audio or video materials. The resources are designed to help youth professionals explore specific themes in an accessible, practical and engaging way.
The toolkits are designed for youth professionals, educators, social workers, volunteers and organisations working with children and young people, especially in vulnerable contexts.
Yes. The educational posters, activities, manuals and online training programmes can be accessed or downloaded for free through our digital platforms.
Most toolkits and online trainings are available in multiple languages. Available languages can be selected directly on the toolkit pages and on our digital platforms.
Yes. The activities are designed to be flexible and adaptable for different ages, group sizes and contexts. Youth professionals are encouraged to adapt methods to the needs of their target group.
The toolkits are developed together with partner organisations, youth professionals and thematic experts. They combine practical experience, educational methodologies and topic-specific expertise.
Each toolkit focuses on a different theme, such as trauma, financial literacy, children’s rights, health or relationships. You can explore the toolkit pages to find the themes most relevant to your target group and daily practice.
The toolkits are developed in collaboration with partner organisations, thematic experts and youth professionals, often within international projects and partnerships.
All posters, games and activities are available through StreetSmart Play. Each toolkit page links directly to the relevant materials.
Yes. The posters and manuals can be downloaded and printed locally for use in workshops, youth activities and educational sessions. All materials are available for free in full-size print format on StreetSmart Play.
For some toolkits and projects, printed materials can be ordered. Availability depends on the toolkit and current stock. You can check our current offer on our StreetSmart webshop.
No prior training is required. The materials are designed to be accessible and easy to use. However, we also offer free online training programmes and workshops to help professionals deepen their knowledge and confidence.
Yes. Several toolkits are supported by interactive workshops, masterclasses or train-the-trainer sessions for organisations and professionals.
You can contact us through the website to explore workshops, partnerships, training opportunities or collaborative projects around the toolkits.
Are you new to StreetSmart Impact? Follow these steps:
Have you completed the above steps? Then you are ready to fully integrate StreetSmart Impact within your organisation.
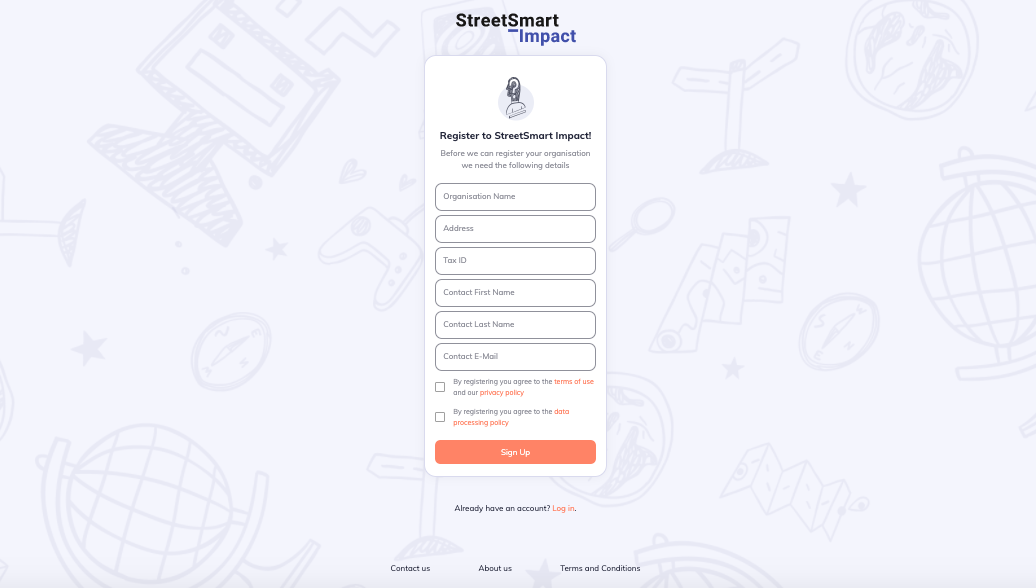
Surf to https://impact.street-smart.be/signup and answer the questions. To complete the registration you will receive a confirmation email asking you to set up a password. Check your spam or junk folder if you haven’t received the mail.
To create an account on StreetSmart Impact you must first receive an invitation mail from your organisation. When you receive this mail you can set up your own account and password. You can log in to your StreetSmart Impact account on the webplatform or the app. Go to https://impact.street-smart.be/login and download the StreetSmart Impact app. Log in with your StreetSmart Impact account using your e-mail address and password. To ensure access protection when using the app you will be asked to set up a pincode. You can also choose to use biometric verification for access protection.

The first time you log in to StreetSmart Impact you will need to use your account details (email address & password). Once you are logged in you will be asked to set up a pincode.
You will need to enter this pincode each time you return to the app. The pincode ensures that only you can access the app, making secure all the details you have registered. If you don’t use the app for a long time you will be asked to log in again with your account details and create a new pincode.
Surf to https://impact.street-smart.be/forgot-password or in the app click on ‘Password forgotten’ and enter your e-mail address. You will receive a link to set up a new password. Check your spam or junk folder if you haven’t received the mail.

When you don’t receive the mail there are several options:
Is there something wrong with the log in? There can be a number of reasons:
StreetSmart Impact is available in Albanian, Dutch, English, French, Greek, Polish, Romanian and Spanish. You can manually change languages on the web platform. On your smartphone it will automatically default to the same language as your smartphone. If your smartphone isn’t in one of the StreetSmart Impact languages, the app will default to English.
The inclusion of a VAT number is not necessary. Adding a Visa card number will facilitate the monthly payment of the licence fee as the costs will be settled automatically. If the licence is not paid your access to StreetSmart Impact will be blocked.
You cannot cancel your organisation from StreetSmart Impact yourself. Instead, send a request mail to info@street-smart.be and we will remove your organisation within 24 hours. Once the organisation has left, none of the colleagues will have access to their account.
Take Note! After the organisation is removed, the gathered data will be available only for a short time and then permanently deleted. It cannot be recovered.
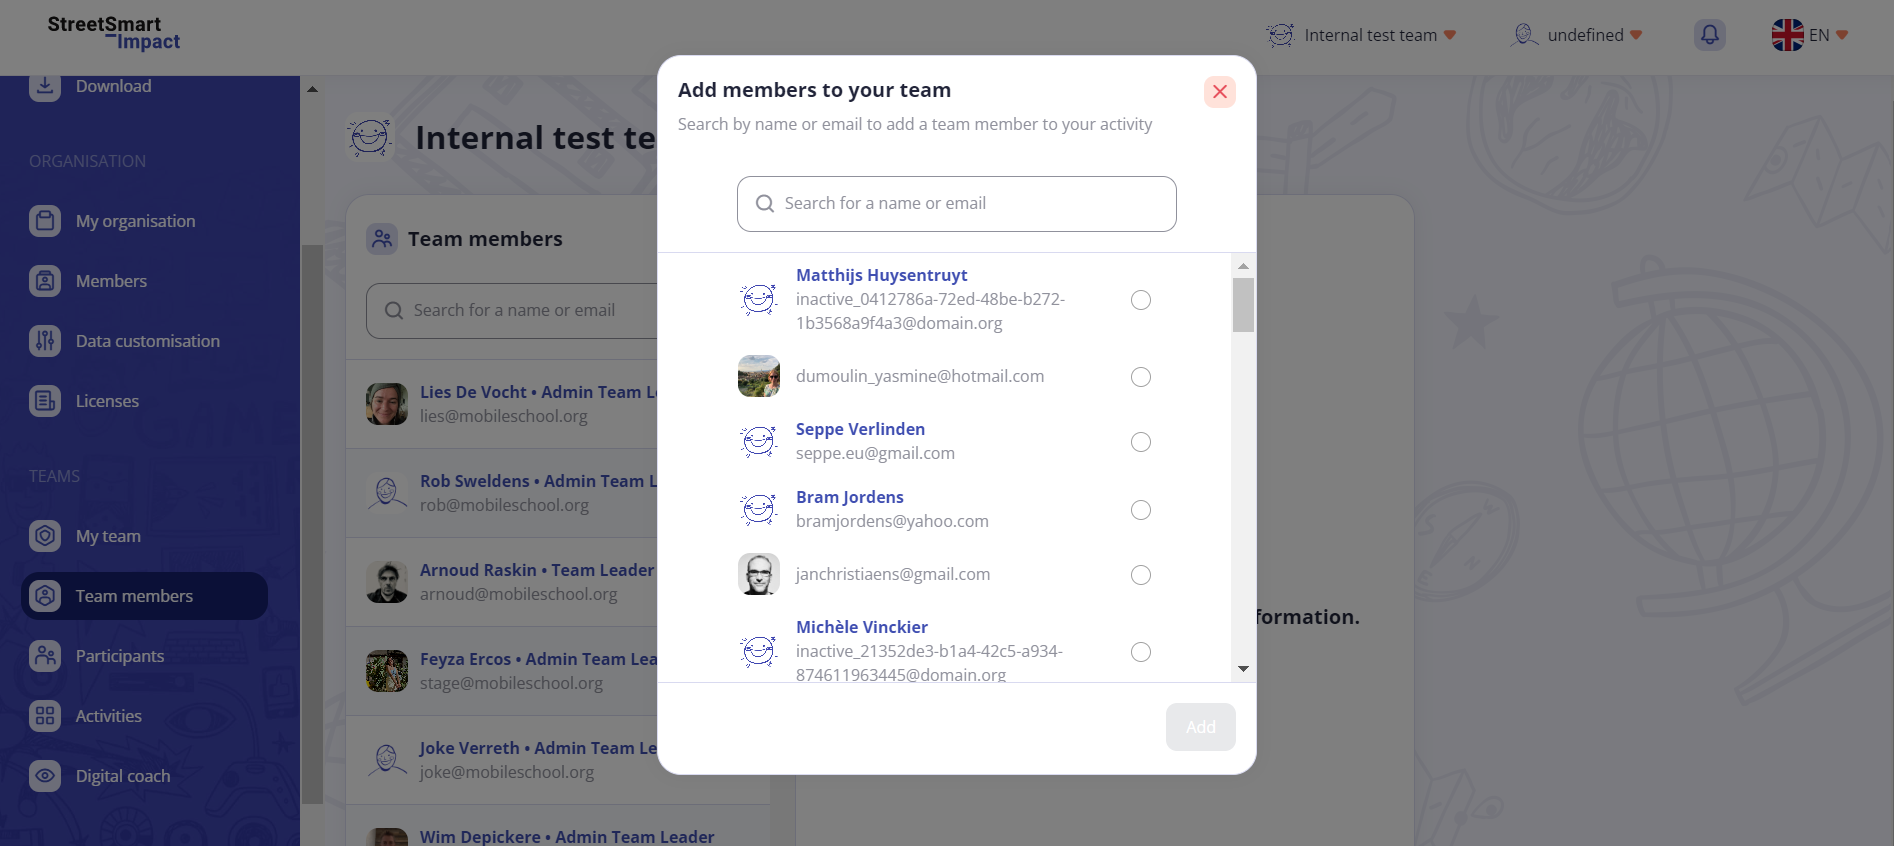
To add colleagues to your organisation you will need to send them an invitation by e-mail. Only the administrator can add new members via the web platform to the organisation.
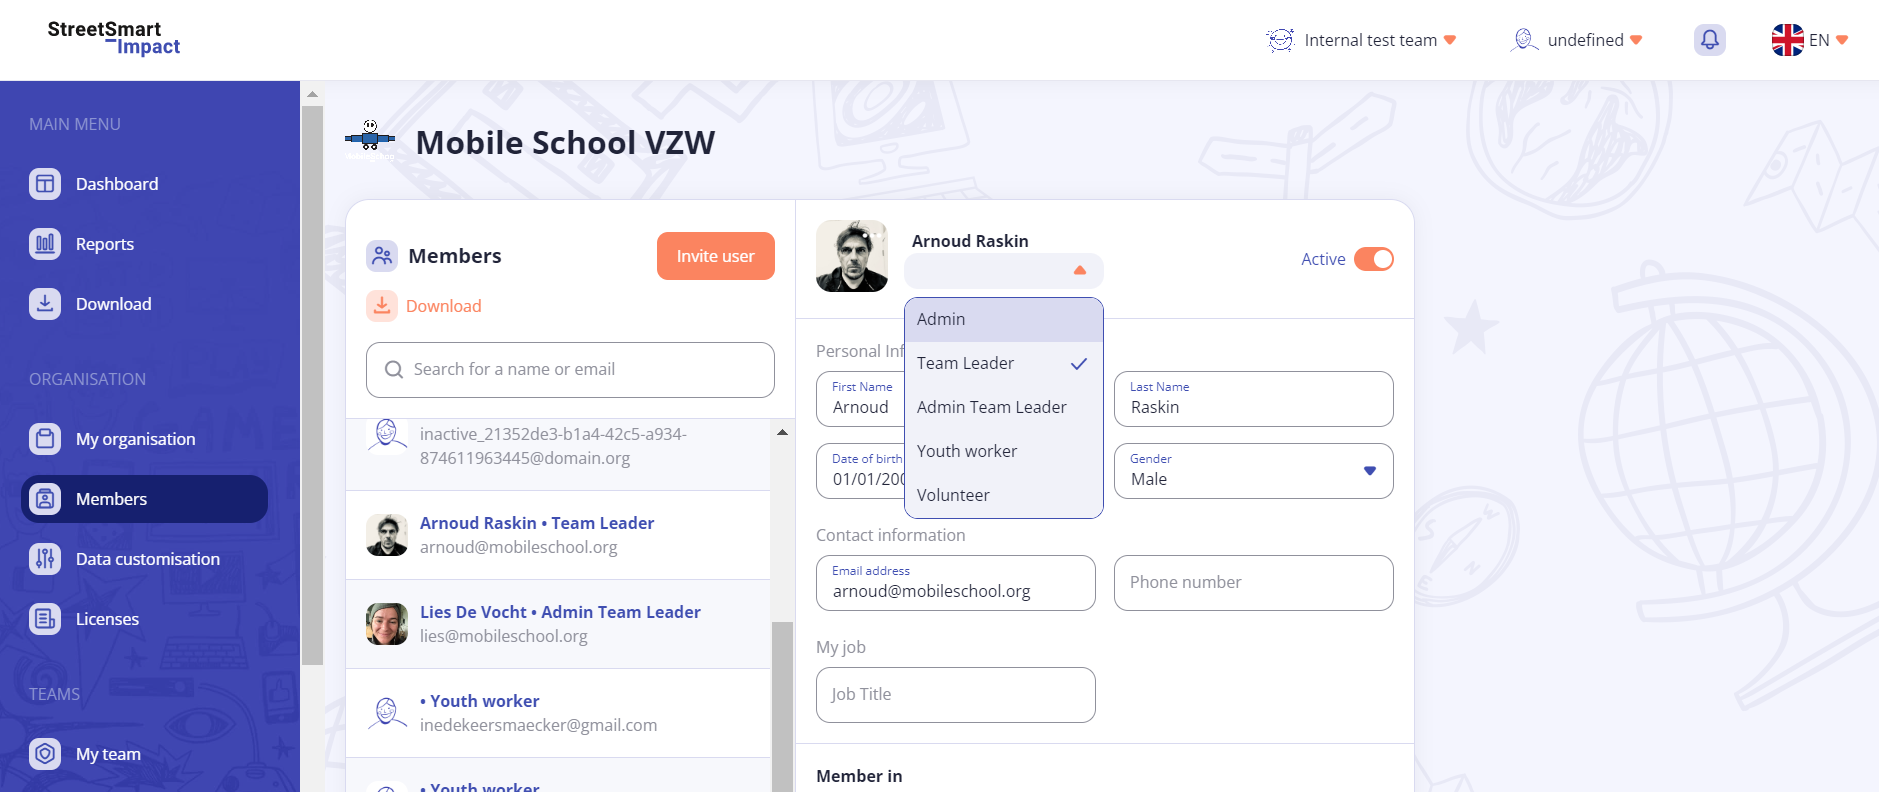
You have a choice between five roles. The StreetSmart Impact data access that each user has depends on their role. In this way you can also guarantee data protection within your organisation. Not all colleagues should need or may have access to the same data.
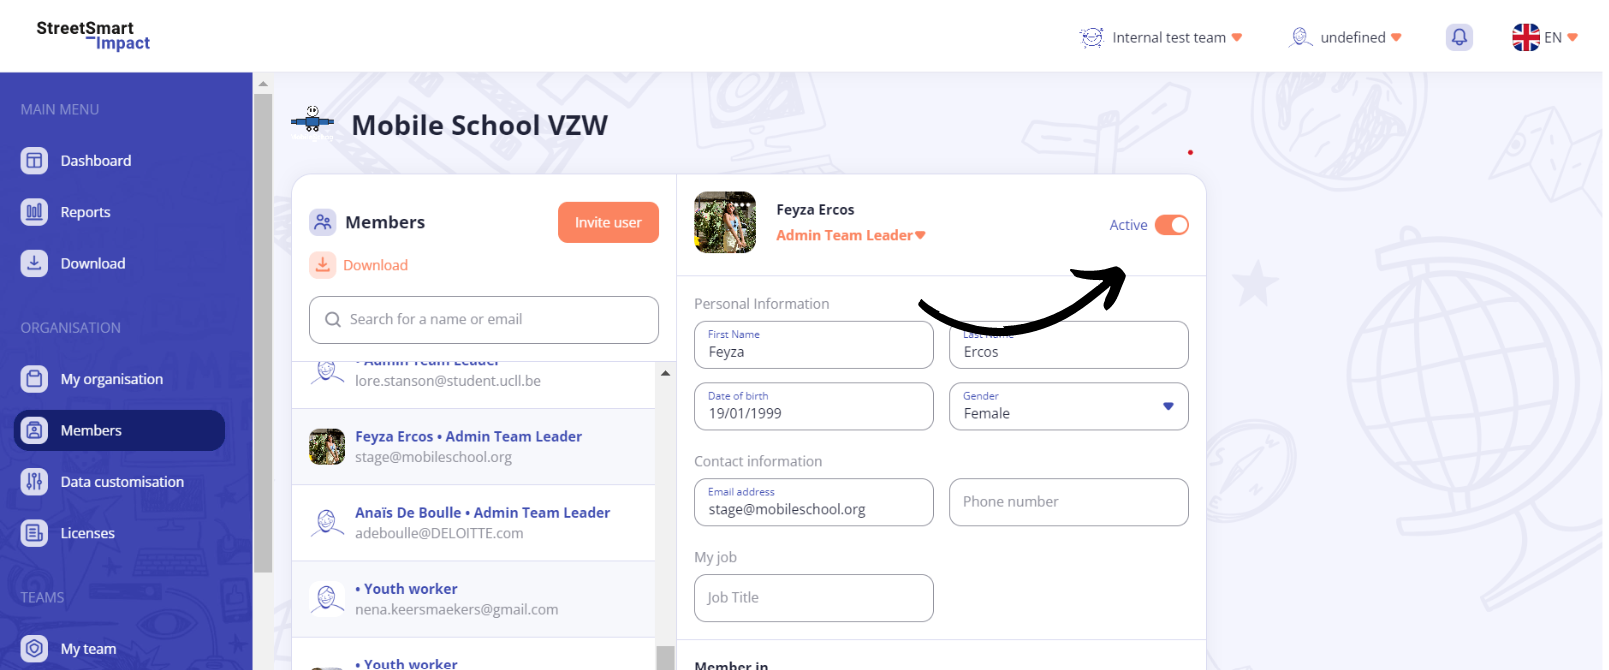
A colleague’s role can only be changed by the platform administrator. Both the colleague and the administrator can change the individual’s profile information.
When a colleague is no longer active in your organisation the administrator can ensure that he no longer has access to the organisation’s StreetSmart Impact data. This option can be reversed at any time. You can re-activate a colleague and give them access to their account following the same steps.
Take Note! An inactive colleague will still have a licence for the remainder of the month they were made inactive. Their licence will become inactive from the following month.
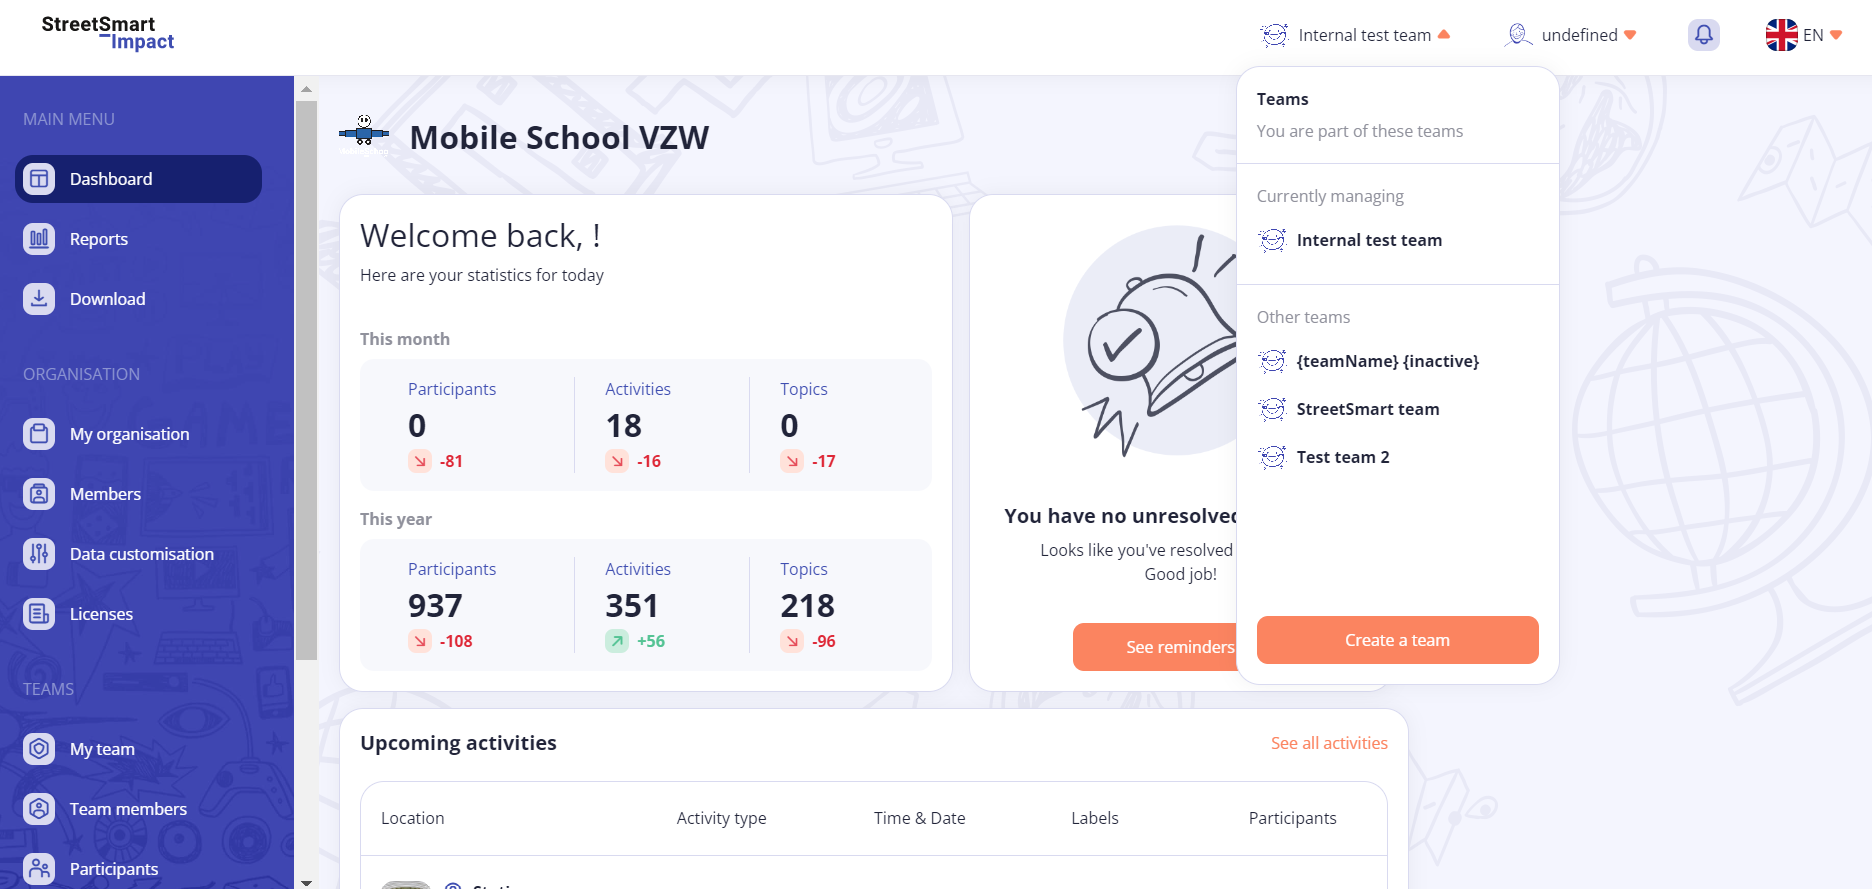
In an organisation there can be different teams set up by the administrator. The administrators and team leaders can assign colleagues to these teams.
Personal information from a youngster is only available for members of the team which the youngster is linked to. For example colleagues only see the data of the young people they work with, so that you can regulate data protection within your organisation.
Both youth workers and young people can be in multiple teams.
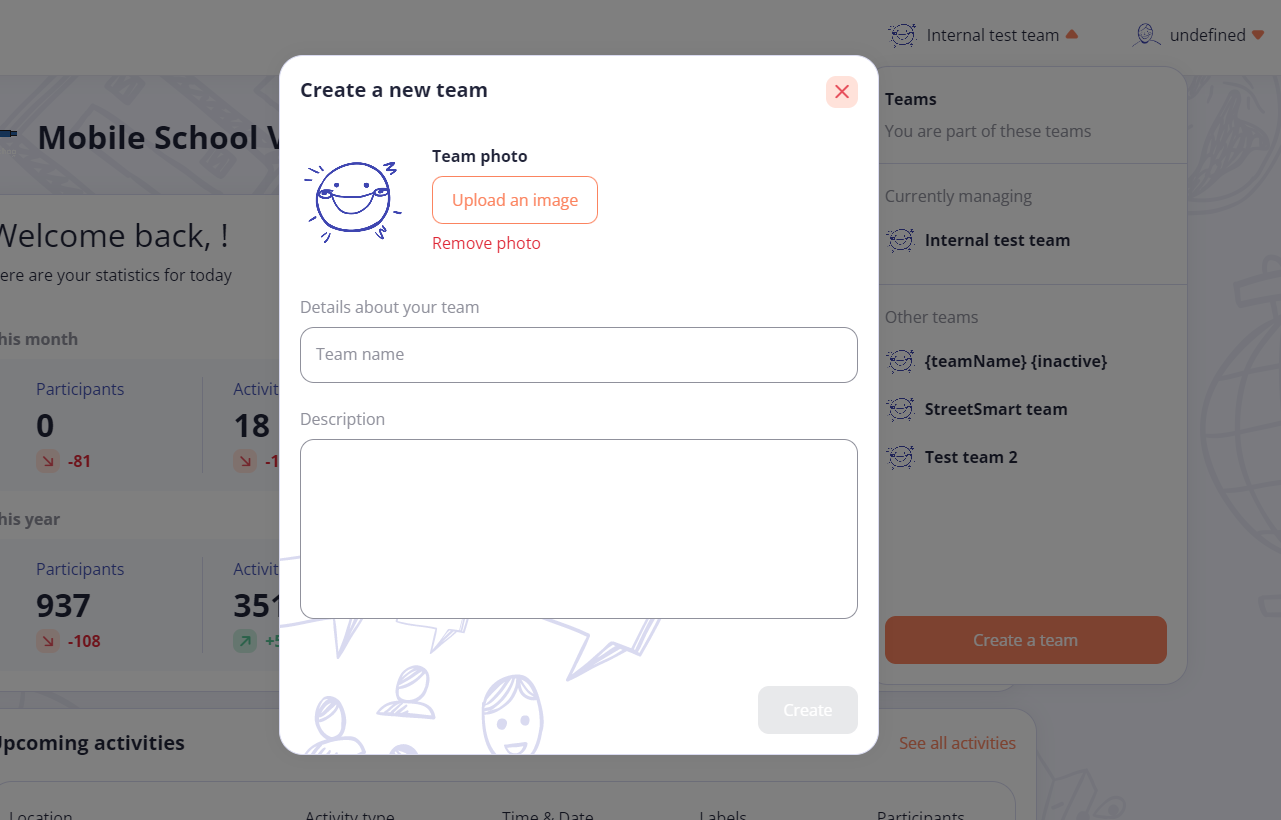
Only the administrator can create a team in an organisation. He or she can create multiple teams.
Yes, you can be part of more than one team. In the app select the appropriate team when creating a topic. Also on the web platform select first the team in which you want to collect data or make changes.
Only team leaders can add a colleague to a team. To do this the colleague must first be registered as a member of the organisation.
Only the team leader can remove a colleague.
Take Note! A colleague who is removed from a team remains a member of the organisation. The colleague will no longer have access to the data registered within the team.
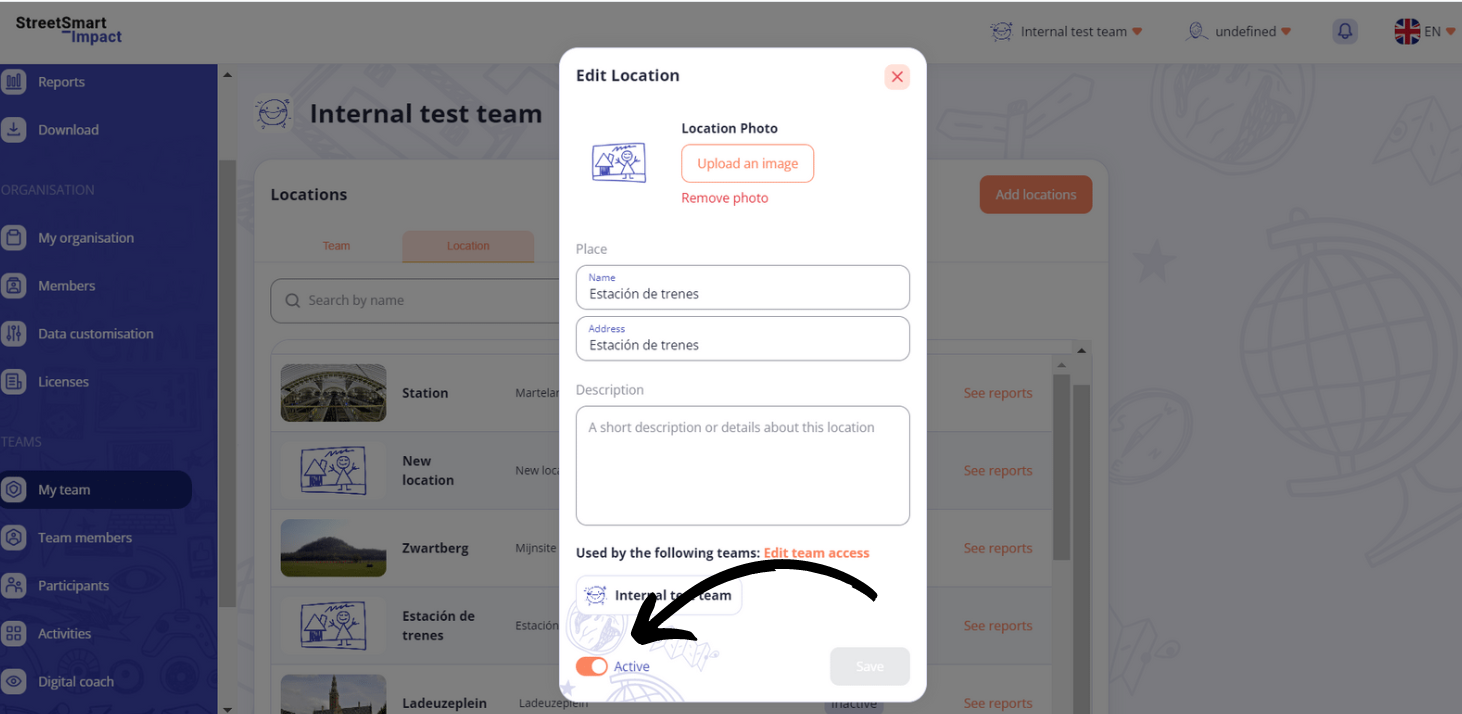
Adding locations to your team shows you where activities are organised by your team. Only team leaders can add locations.
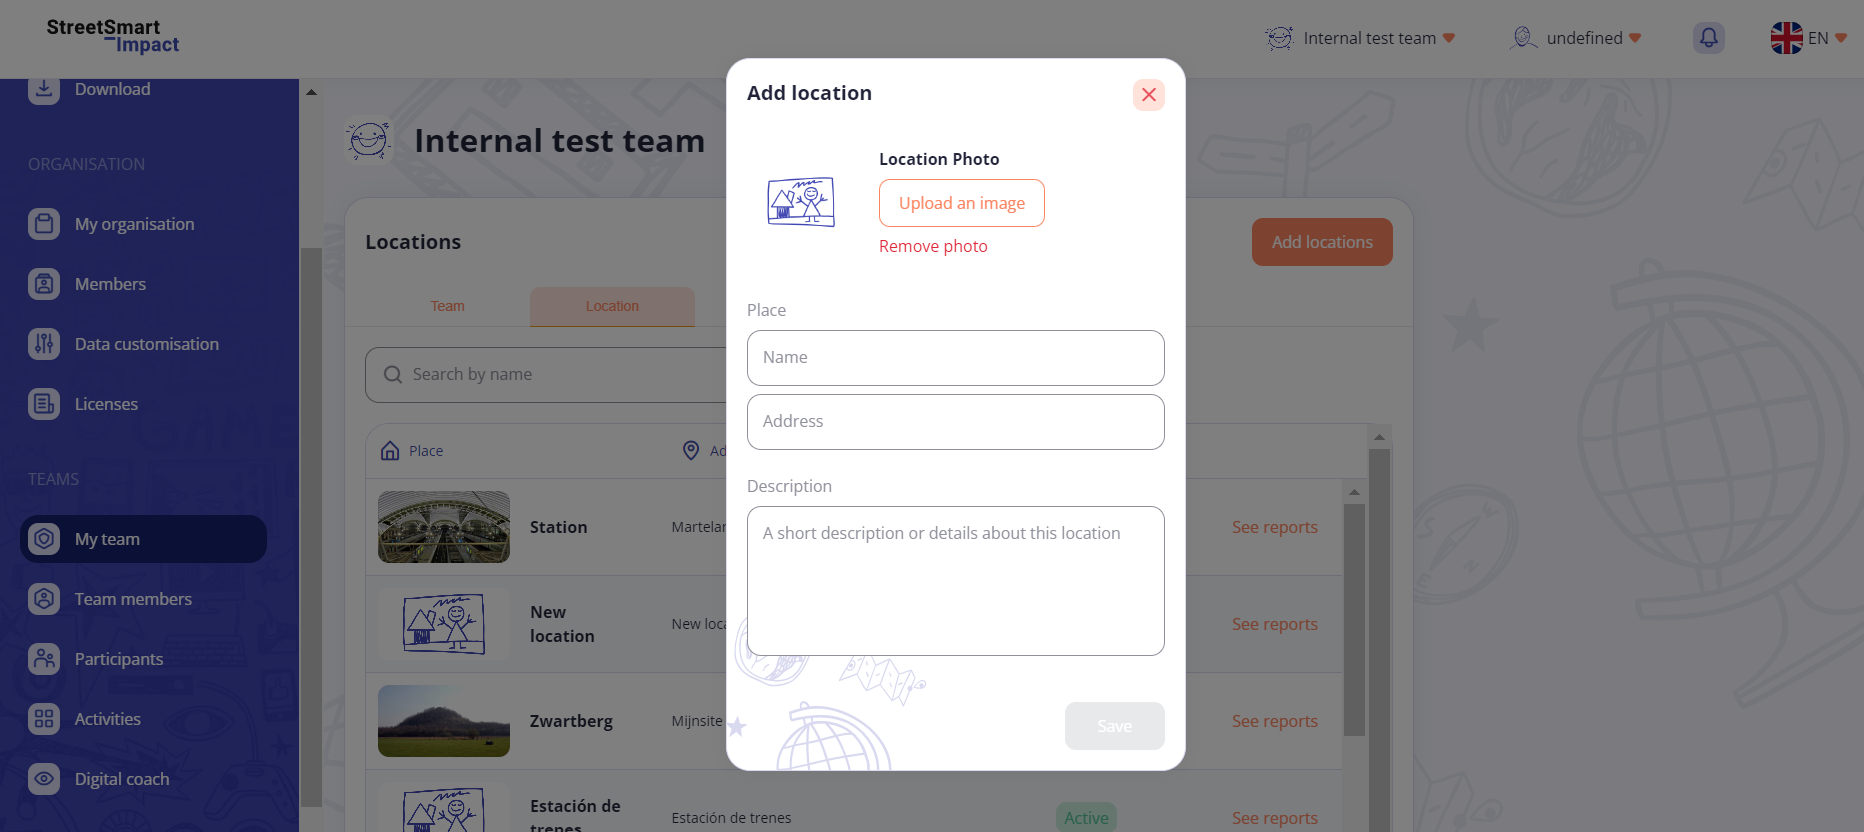
Only the team leader can make a location inactive.
Take Note! If a location is inactive, all the registered data is not deleted. That means that your reporting from this location can still be accessed but you cannot register new activities from this place.
When a team is no longer active in the organisation, the administrator can remove the team. Once the team is removed, the team leader will not have access to the data collected within this team.
Take Note! If a team is removed, all the registered data from that team will also be removed.
No. You have no access to personal information registered within other teams.
To register a youngster in a team, create a participant’s profile. You can do this on the web platform but also in an activity on the app using the shortcut key.
Yes, you can assign a participant to different teams. This function ensures that you don’t have to make two accounts for the same participant in your organisation.
Take Note! Only the profile data and notes to be explicitly available between all teams will be shared.
A social contact with a participant can be added via the web platform or the app by following the steps below.
All recorded notes relating to a participant can only be found on the web platform. You can look for a specific note by using the filters (date, subject, life event, visibility).
When an unknown or unregistered young person participates in an activity you can record this person as an ‘anonymous participant’. You can add them to the activity but you can’t add an evaluation for them.
An anonymous participant is counted in the total number taking part in an activity. If you want to add more details then you must register the individual by making a participant profile.
Whenever you make two profiles for the same person you can merge these. All collected data and the most recent profile details are saved.
A participant who will not be followed, permanently or temporarily, can be de-activated or removed by the team leader.
Take Note! A deactivated participant will not appear in the app and can no longer be registered for an activity. The team leader can re-active the profile.
Take Note! When a participant is definitively removed, all the previous details for this person will be deleted. Only their registered presence in earlier activities will remain anonymously.
You can create an activity on the web platform and in the app by following the steps below.
When the activity type isn’t shown in the options list it means that this type hasn’t been added by the administrator of your organisation. The administrator can add activity types by using the ‘Personalise your details’ tab on the web platform. Click here to see how to change data options.
When the location isn’t shown in the options list it means that this location hasn’t been added by the administrator, team leader or administrator/team leader of your organisation. They can at any time add a location to a team. Click here to see how to add a location.
Yes. Via the web platform you can remove an activity providing there are no participants registered for this specific activity. If there are participants you will see a fault message. You will then need to remove all the registered participants before continuing.
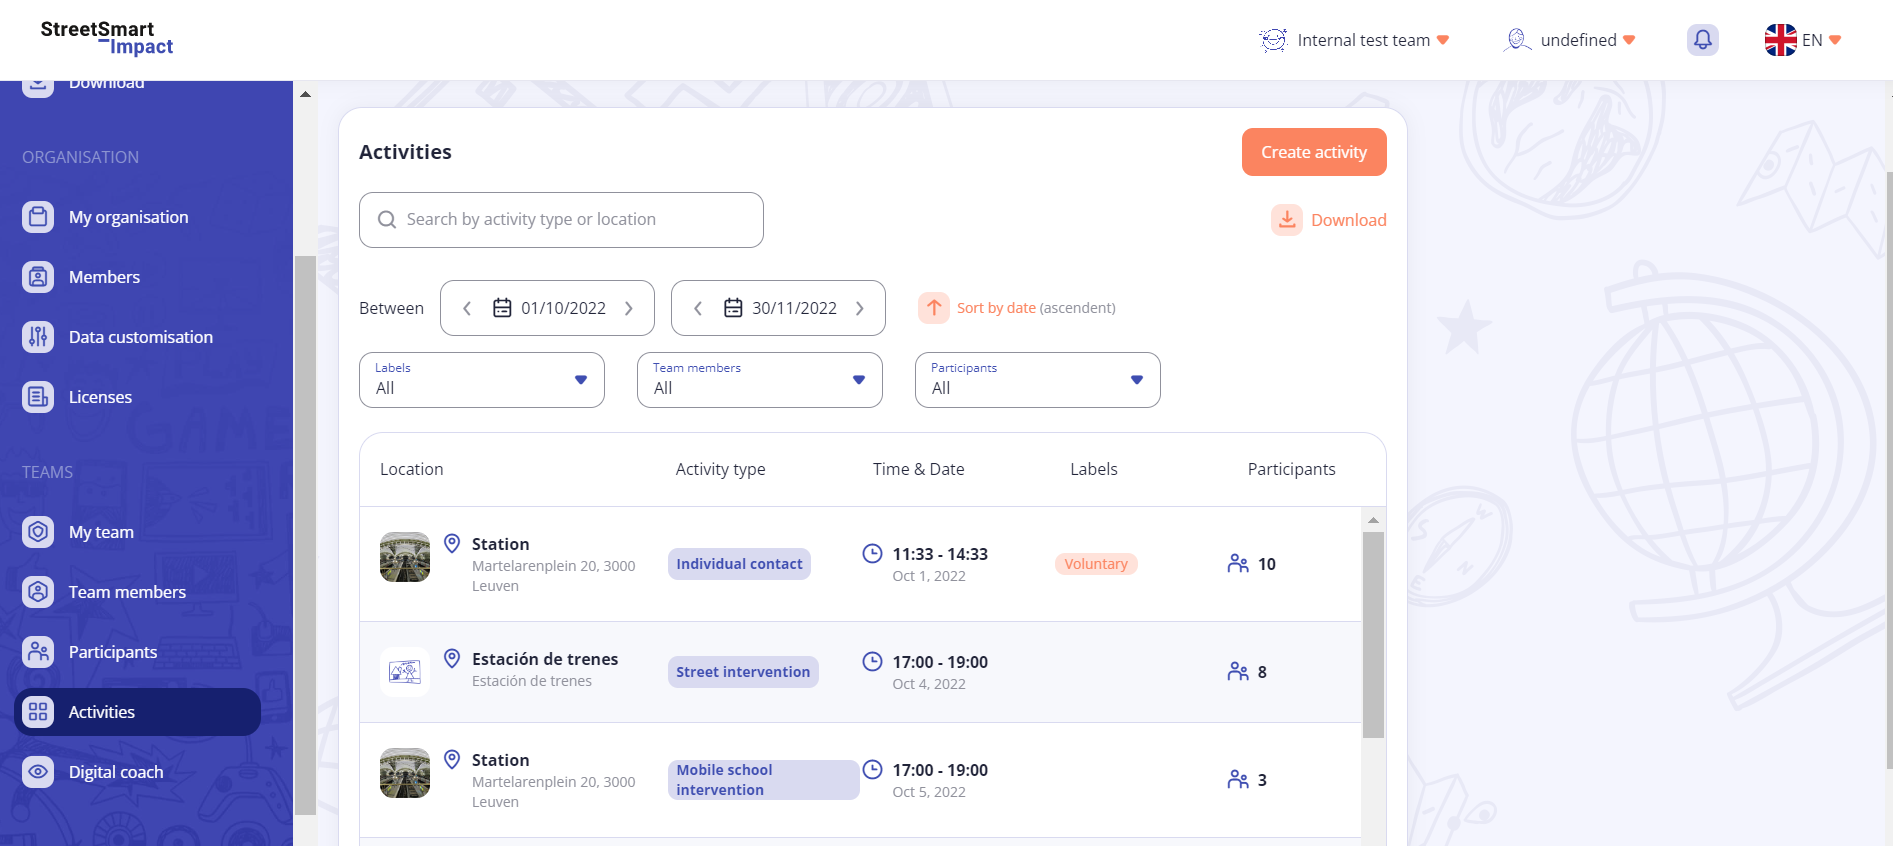
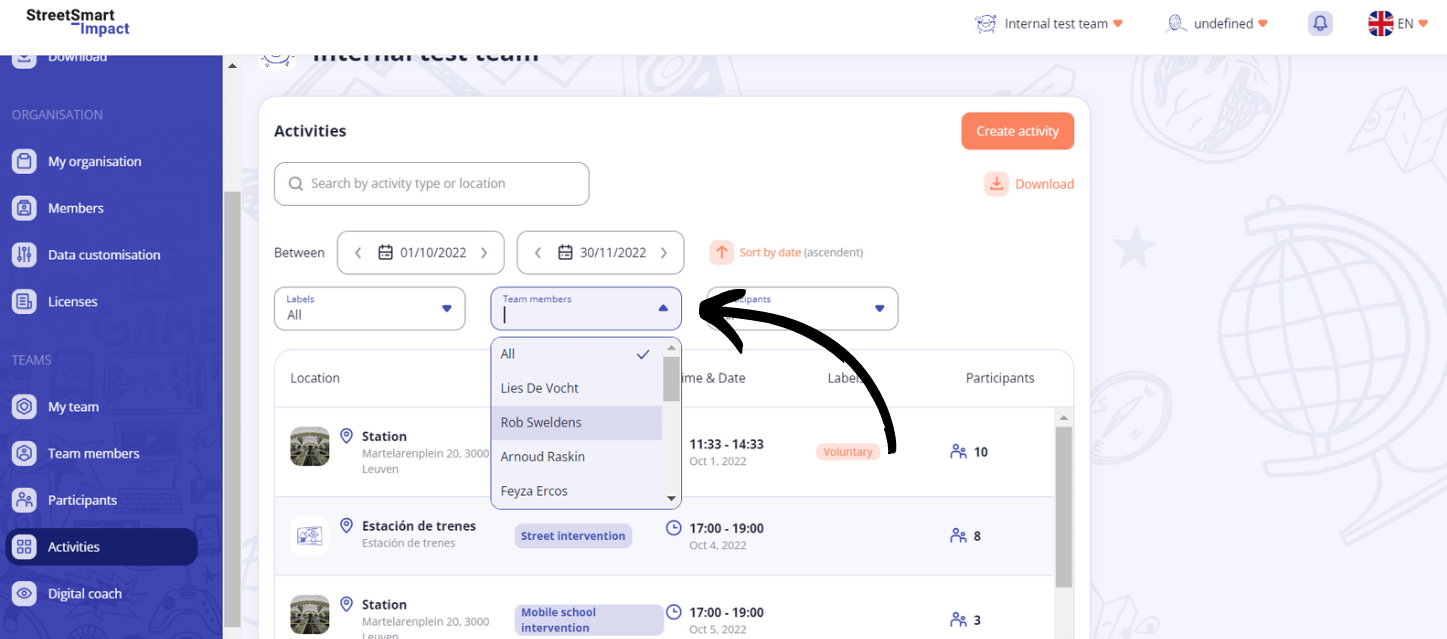
You can find an overview of your activities on the web platform and in the app.
In the 'Activies' menu you can find all the activities planned for your team. You can filter the activities by ‘all’, ‘past’ or ‘upcoming’. In the overview you can sort by oldest or newest date order.
Are you looking for a specific activity? Use the search button and enter the activity type or the location to make it easier to find the one you are looking for.
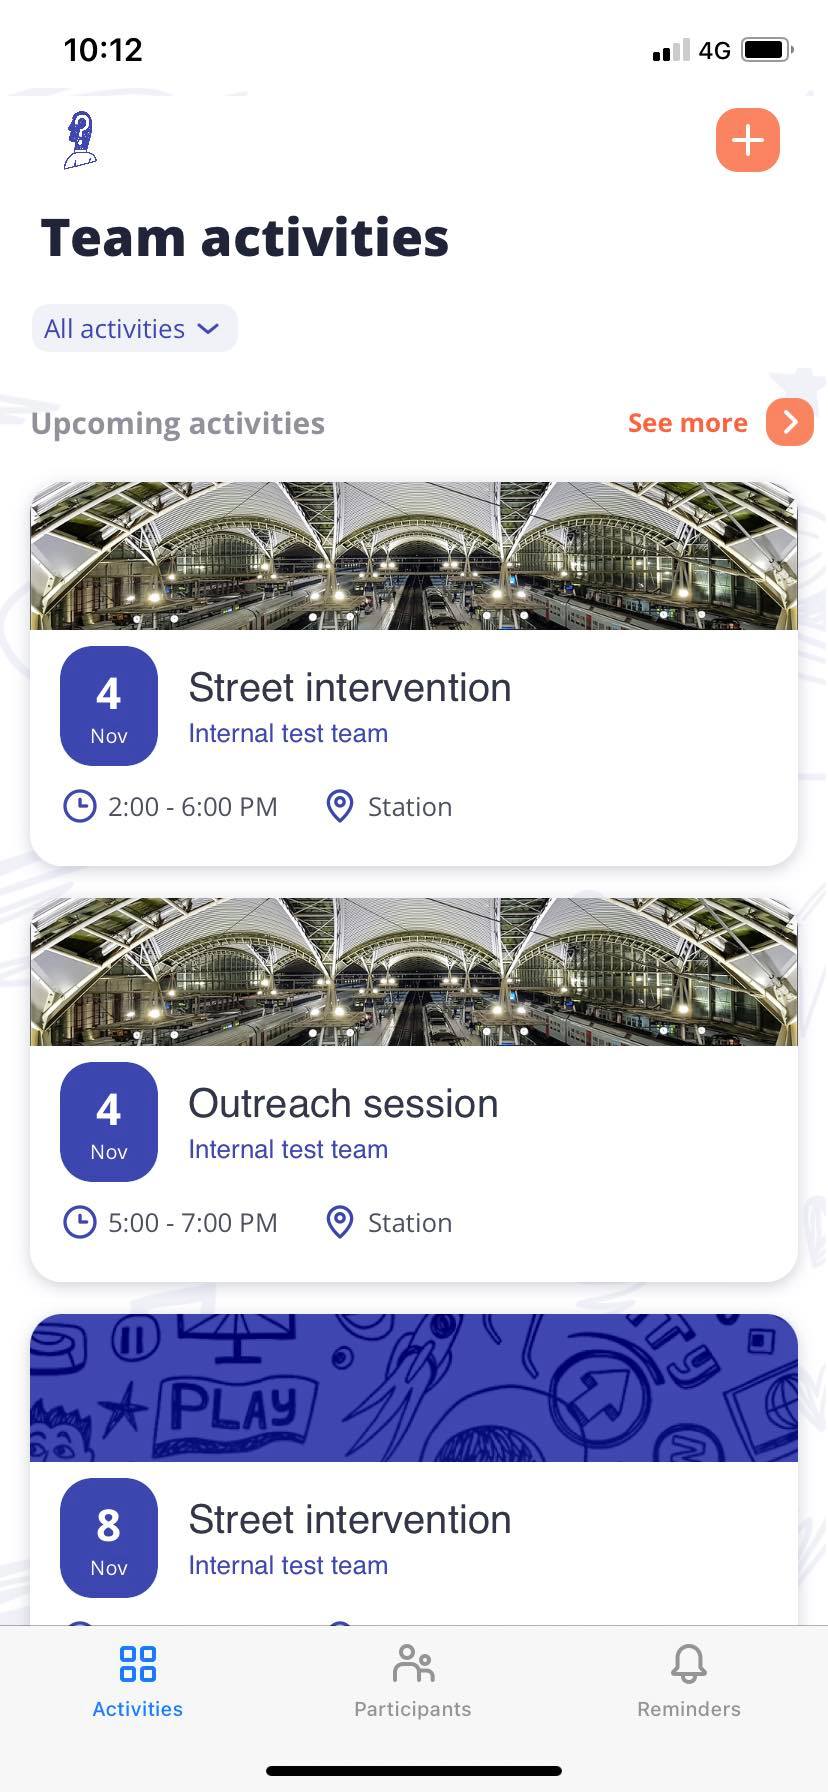
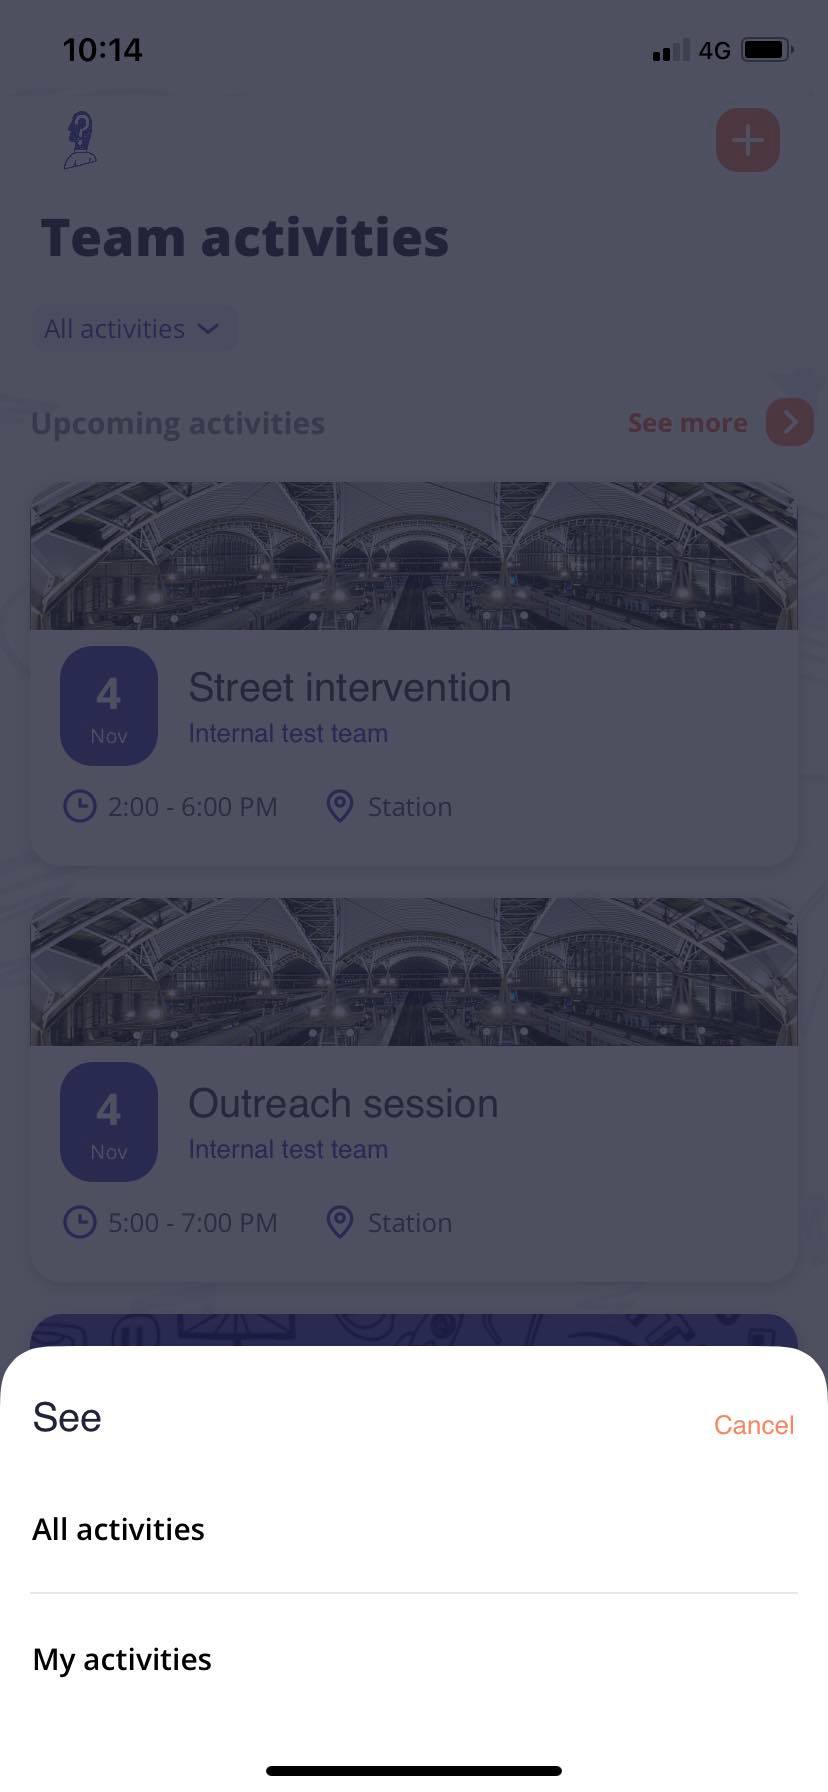
In the 'Activity’ menu you will find all the activities planned for your team. You can filter by ‘All activities’ or ‘My activities’*. The app shows a fixed number of past and upcoming activities. Click on ‘See more’ to view all the activities.
*Do you want to know the difference between ‘All activities’ and ‘My activities.’? Click here.
In the StreetSmart Impact app you can filter the overview between ‘All activities’ and ‘My activities’.
Click here to see how to add a team member to an activity.
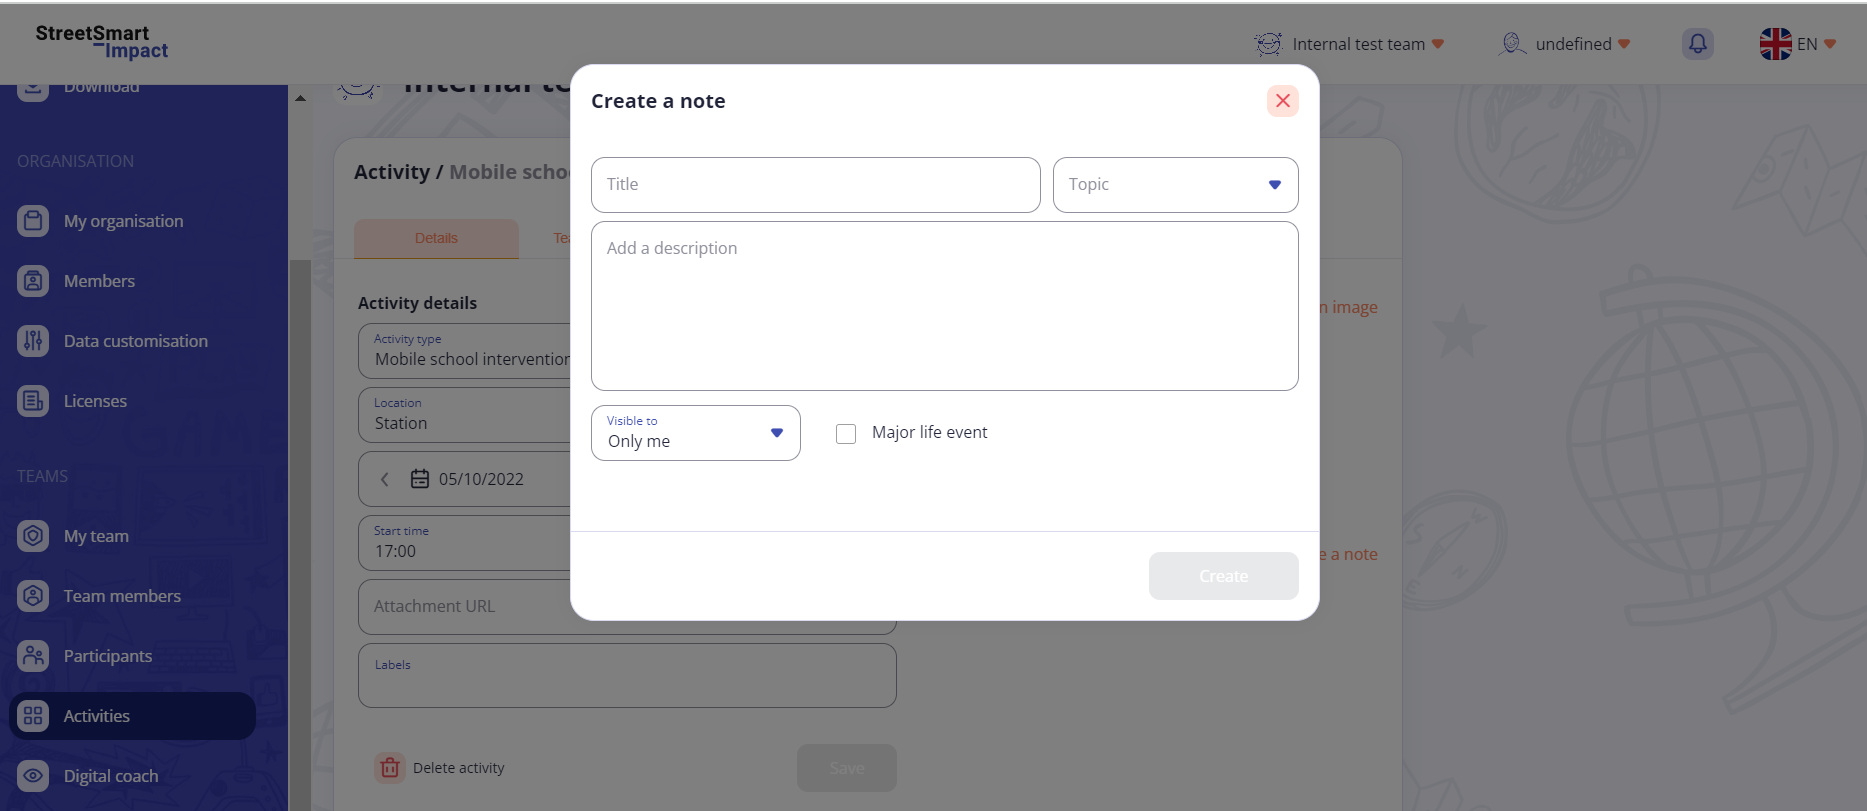
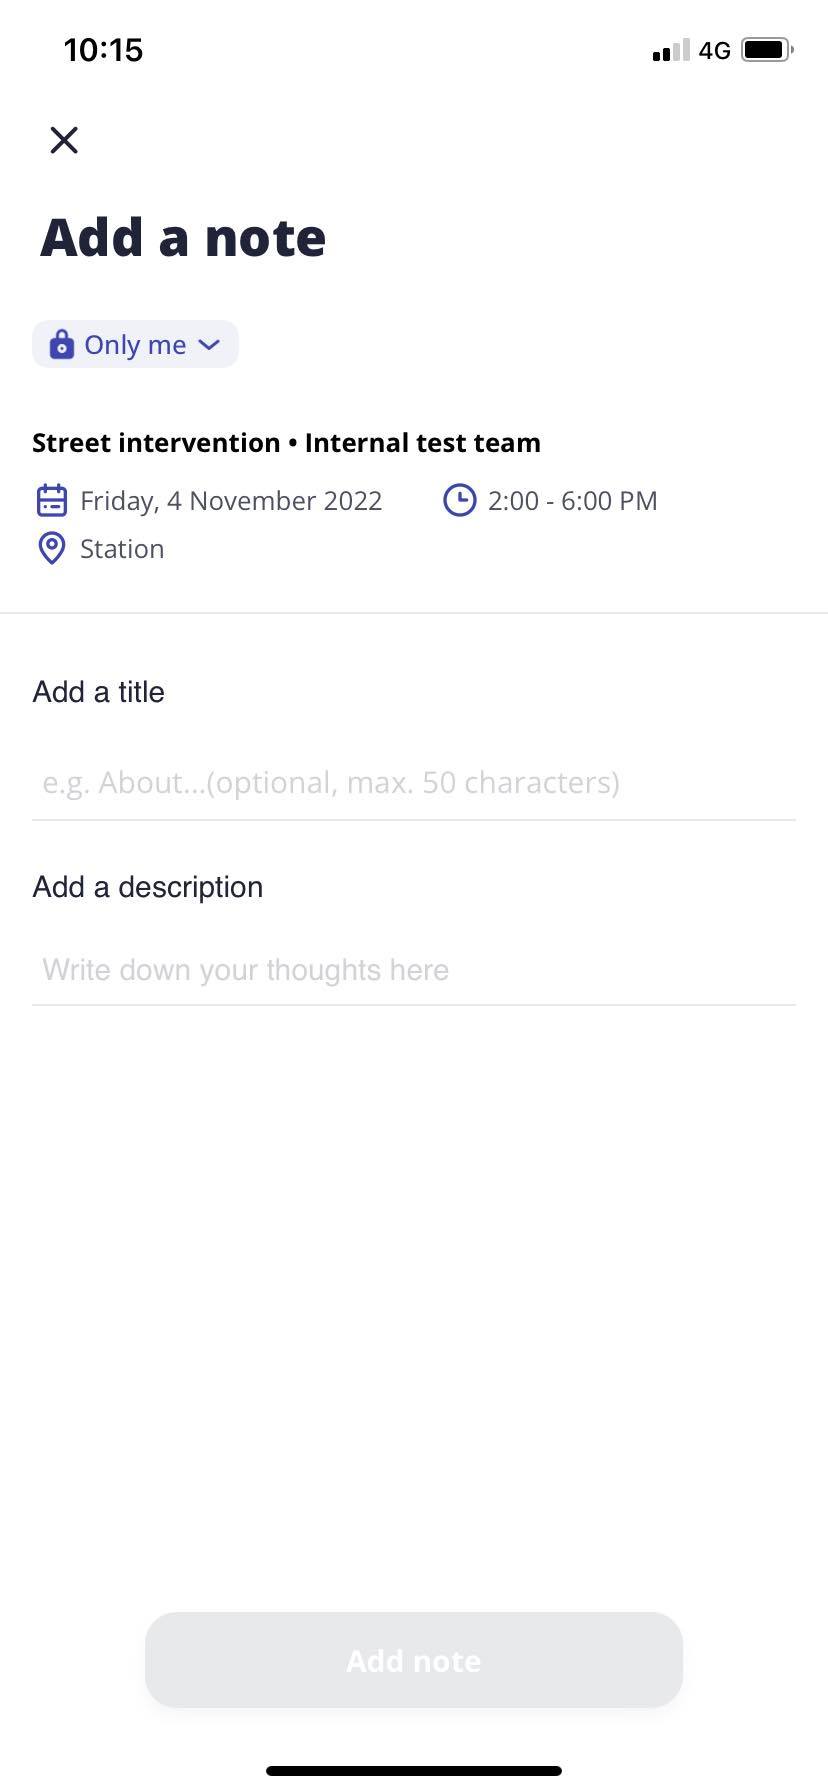
You can add a note to an activity on the web platform or in the app. in de app.
This can only be done on the web platform. A team member who has been added to an activity can find this activity under ‘My activiteiten’ in the app.
A participant can be added to an activity on the web platform or in the app. Is the participant not yet registered? Add the youngster as an ‘anonymous participant’ or create a participant profile via the shortcut key.
A topic can be added to an activity on the web platform or in in the app.
Is a specific topic not shown in the options? Check first if this topic has been added to the activity. Only then can you select it. Does the topic also not show in the general options? Then it means that this topic has not been added by the administrator from your organisation. The administrator can add topics using the ‘Personalise the details’ tab on the web platform.
The ‘URL attachment’ is not compulsory but allows you to add a link to a website, YouTube, a meeting in Zoom or Teams etc to your activity. The youngster who uses the StreetSmart Impact app and has been invited to an activity with a URL can also see the URL.
No, a youngster doesn’t have to take part in all the topics of an activity. When creating an acitivty you can state which topics will be organised within it. You can simply assign to the youngster the topics that they took part in.
Indicating which topic(s) a participant took part in can be done on the web platform or in the app. Go to the participant’s name in the relevant activity to register an individual evaluation and follow the steps shown.
Is a specific topic not shown in the options? Check first if this topic has been added to the activity. Only then can you select it. Does the topic also not show in the general options? Then it means that this topic has not been added by the administrator from your organisation. The administrator can add activities using the ‘Personalise the details’ tab on the web platform.
A topic can’t be evaluated. You can only register which topic(s) the youngster took part in.
In StreetSmart Impact you can’t do a group evaluation. The web platform and the app only give you the possibility to make an individual participant evaluation. Via the web platform it is possible to see a group report at the activity level. This allows you to know more about ages, genders, moods and skills of the participants at that activity.
An individual evaluation can quickly and easily be done via the app. It is also possible to register an evaluation via the web platform. An evaluation is registered in an activity. By regularly evaluating youngsters you can follow their evolution.
No problem! In the app the last registered evaluation is saved. If you made a mistake, you can log a new evaluation. Also on the web platform it’s easy to correct your mistake.
No. You cannot see who has registered the information. Only notes have the name of the person who added them. You can see which youth workers were present providing they were added to the activity on the web platform.
Click here to see how you can view the team members present at an activity.
Yes. Multiple youth workers can at the same time log the same individual evaluation.
Take Note! Only the details from the last registered evaluation are saved.
In the app it’s true that you won’t see the image you uploaded during an individual evaluation. In this way we avoid the app using too much of your gsm’s memory. You can see all the images via the web platform, in the youngster’s participant profile.
You can evaluate the mood on the web platform and in the app. Go to the participant’s name in the relevant activity to register an individual evaulation and follow the steps shown.
You can evaluate a participant’s skill on the web platform or in the app. Go to the participant’s name in the relevant activity to register an individual evaulation and follow the steps shown.
When a skill isn’t included in the options, it means that the administrator from your organisation hasn’t added it to the list. The administrator can add skills using the ‘Personalise the details’ on the web platform. Click here to see how to change the data options.
You can evaluate a social contact on the web platform or in the app. Go to the participant’s name in the relevant activity to register an individual evaulation and follow the steps shown.
You can evaluate the other occupations by a participant on the web platform or in the app. Go to the participant’s name in the relevant activity to register an individual evaluation and follow the steps shown.
When a measure of other evolution isn’t shown in the options, it means that the administrator of your organisation hasn’t added it to the list. The administrator can add measures of other evolutions using the ‘Personalise the details’ tab on the web platform. Click here to see how to change the data options.
The social map for a participant shows their social network in a map. You create a social map with the most important people in their network and, together with the young person, evaluate them.
Click here to see how to add a social contact to a participant. The relationship of the most important people in the youngster’s network are evaluated. Click here to see how to evaluate a social contact.
You can create a goal for a participant on the web platform or in the app. Go to the participant’s name in the relevant activity to register an individual evaulation and follow the steps shown.
When the goal type doesn’t appear in the options, it means that the administrator from your organisation hasn’t added it to the list. The administrator can add goal types in the ‘Personalise the details’ tab on the web platform. Click here to see how to change the data options.
You can evaluate a goal on the web platform or in the app. Go to the participant’s name in the relevant activity to register an individual evaulation and follow the steps shown.
You can close a goal on the web platform and in the app. Go to the participant’s name in the relevant activity to register an individual evaulation and follow the steps shown.
No. Once you close a goal it is no longer visible in the app. On the web platform you can continue to view all the registered details of a goal.
A reminder helps you not to forget important things connected to a specific participant. You can create a reminder on the web platform or in the app.
Take Note! Only reminders made in the app can be converted to notes later. A reminder created on the web platform can’t be converted to a note so only use this if you need to temporarily remember something.
Take Note! In the app you can only create a reminder in the individual evaluation of a participant.
You can create a reminder on the web platform and in the app by following these steps.
You can consult your reminders on the web platform or on the app. Reminders made on the web platform show up on the app and vice versa.
You can complete a reminder on the web platform or in the app. When you have completed a reminder, it will be deleted and you will no longer be able to see it.
You can turn a reminder into a note on the web platform or in the app. Important! You can only create a note from a reminder that has been made in the the app within an individual evaluation for a specific participant.
Notes can be created on an individual level or on an activity level:
You can find your notes on the web platform. Notes are not visible in the app.
A life event is an event that has a big impact on the young person. Whenever you indicate on a note that this was a life event, this will be highlighted on the individual report and on the location report.
StreetSmart Impact generates reporting on 4 levels:
The general reporting can be found on the web platform. Do you need a specific report? That can be done! By using the filters (time frame, teams, location, age group, team leader, activity sort and activity lable) you can easily find the graphs that you need.
The activity reporting can be found on the web platform.
The location reporting can be found on the web platform.
The individual reporting can be found on the web platform. Do you need a specific report? That can be done! Select the time frame and you will easily find the graph you need.
No, the StreetSmart Impact app does not give the reporting possibility. Consulting the reporting is done via the web platform.
Yes, anonymous participants are also included in the reporting. An anonymous participant is only included in the graphs that relate to the contact that youth workers had with the participants.
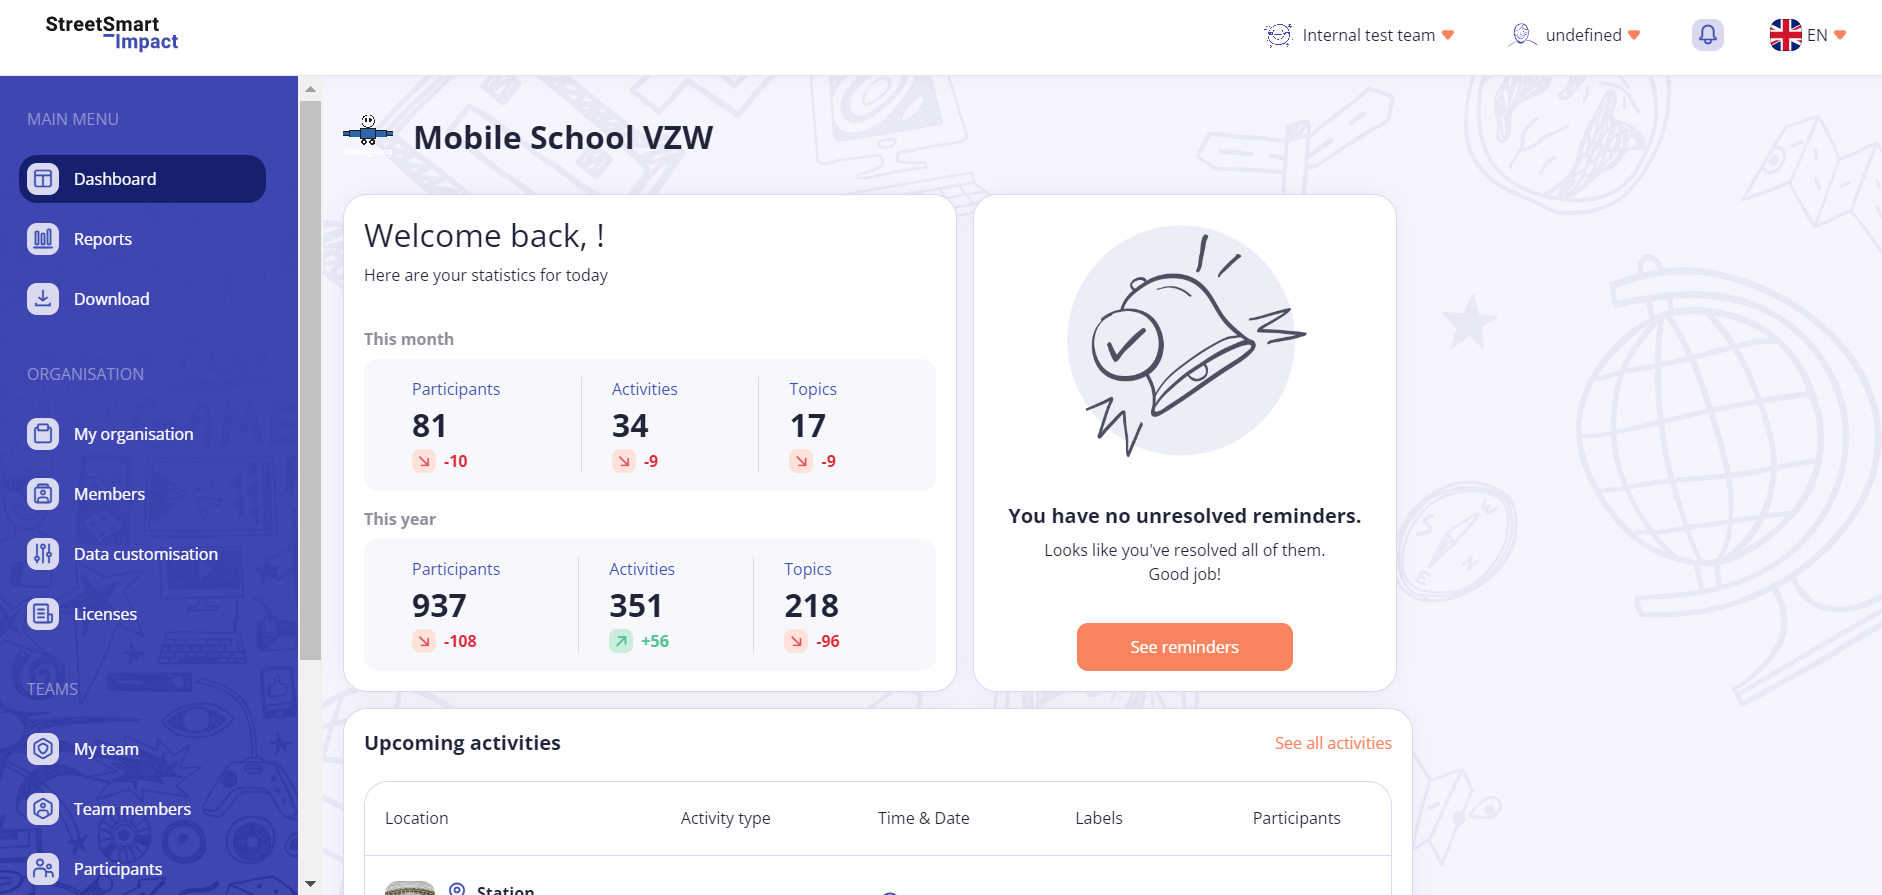
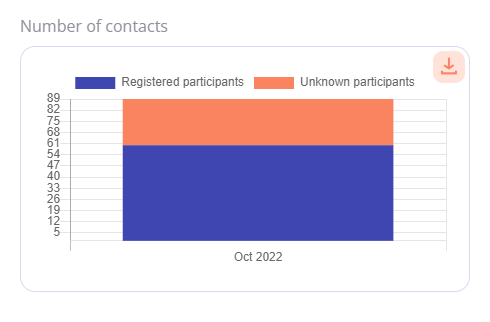
The day’s statistics give a short overview of the activities in your StreetSmart Impact organisation. The graph gives the number of participants, activities and their topics on a monthly and yearly basis.
The red and green numbers and arrows show the difference from the previous month and year. Have the numbers fallen? Then the number is in red and the arrow points downwards. Have the numbers risen? Then the number is in green and the arrow points upwards.
You can export different types of data from the StreetSmart Impact web platform. Here is an overview of the data that you can export and where to find them:
Charts are automatically displayed as a .png image. Participant, evaluation and activity summaries are exported as .json files. You can convert these JSON files to Excel or CSV format yourself using free online tools (see below).
Option 1: Use a free online converter
Option 2: Import the JSON file directly into Excel
You can find more info in the video below or in the manual.
You can find more info in the video below or in the manual.
You can find more info in the video below or in the manual.
You can find more info in the video below or in the manual.
The web platform is only available online. The StreetSmart Impact app is available online and offline.
Data that you enter offline into the app is therefore registered. When you next go online your entered data will synchronise with the online database.
Take Note! When you work offline with multiple youthworkers in the same team, you won’t see what each team member has entered whilst you or they are offline. Take care that you don’t duplicate the registering of information.
No, the planned activities can’t be synchronised with other agendas (such as Outlook).
You can fully customise the StreetSmart Impact environment to fit the manner of working in your organisation and team. By personalising the data lists and profile details you can select which data and details from the young people you would like to track. The personalisation of the lists is done both at the organisation level and at the team level.
The administrator from your organisation can customise the StreetSmart Impact data lists and profile details. They can add and delete options.
Here is an overview of the data lists and profile details that can be modified:
Do you want to add a new option? That can also be done!
Do you want to add a field? That can also be done!
Within each team the data lists and profile details can be further changed. The team leader from each team can specify for each data option and each profile field whether it can be enabled. If a field is disabled it will not be available in the app or on the web platform. The team leader cannot add extra fields or delete fields. This must be done at the organisation level by the administrator.
If you remove your organisation from StreetSmart Impact, all the collated data will be held for a time, then it will be irrevocably deleted.
If you make a colleague inactive, they will no longer have access to the StreetSmart Impact programme. A colleague made inactive will, for that month only, still have a licence. Their licence will be inactive starting from the following month.
If you remove a team, none of these team members will have access to the data registered within that team. If you remove a team then all the registered data for this team is permanently deleted.
If you remove a colleague from your team, this colleague no longer has access to the registered data for that team. The colleague continues to be a member of your organisation.
If you make a location inactive, no new activities can be added to this location. All data registered at this location is saved. The location will still appear in the reporting.
A deactivated participant will not show up in the app and can no longer be registered in an activity. The team leader can reactive the profile.
If you remove a participant, all the registered details of the participant will be deleted. Only their participation in past activities is held anonymously.
You can only remove an activity if there is no registered data and no participants added. A deleted activity will no longer appear in the activities overview.
The legal documents can be found here:
- Terms of Service
- Privacy Policy
- Data Processing Policy
Share your own game by clicking the ‘Share a new game’ at the top of the homepage. Follow the steps of the wizard to complete your upload. Need more information about how to use the wizard? Read this tutorial.
You will always stay the owner of your uploaded materials, but you will give a license to other users of the platform and to us to use and change them. Only upload material of which you have the rights, or which are rights free. For more information, read our Terms & conditions on the StreetSmart Play platform.
StreetSmart Play is a free of charge educational content-sharing platform. Make an account and discover hundreds of educational games and activities for free.
For a quick search, go to the home page and select a topic, learning skill or activity at the top of the page.

For a more extensive search, go to the games page and scroll down. On the left-hand side of the page, you will find a green filter button. Click the filter button and select the filters you want to use.

Scroll down and click apply filters to get the results. More information on the use of filters can be found in this tutorial.
After uploading your game, it might take a while before our content managers publish your game in the other languages. This way, a spelling check can be executed to make sure the description of your game is understandable to other users. Meanwhile, your game will be visible on your own profile under the section ‘Your games that are being reviewed.’
Your favourite games and contributors can be saved in your profile. To add a game to your profile and save it for later, just click the heart button on the game or overview page. To add a contributor to your favourite contributors, go to the profile of a game designers and click the heart button. Both your favourite games and contributors can be found in the ‘My Favourites’ tab in your profile.
Probably, you are not logged in to the StreetSmart Play platform! Click the Login/Sign Up button at the top of the page and follow the steps. No account yet? Check out the tutorial or just register here.
StreetSmart Play is an online content-sharing platform where everyone can share their educational activities with the community. The platform is community owned and quality-control is maintained by a system of rating and feedback. Moreover, users are able to report games if the games are not clear or if they contain inappropriate content which is not in line with the universal children’s rights and our terms and conditions. For more info, check our terms and conditions here.
Click on the register button and fill in the blank fields. After you agree with the terms of conditions, you can create your account.
Already have an account? Sign in with your email address and password.
Check if you used the correct email and password.
Go to the sign in page and click on the ‘Need help signing in?’ button. After you fill in your email address, you can recover your password.
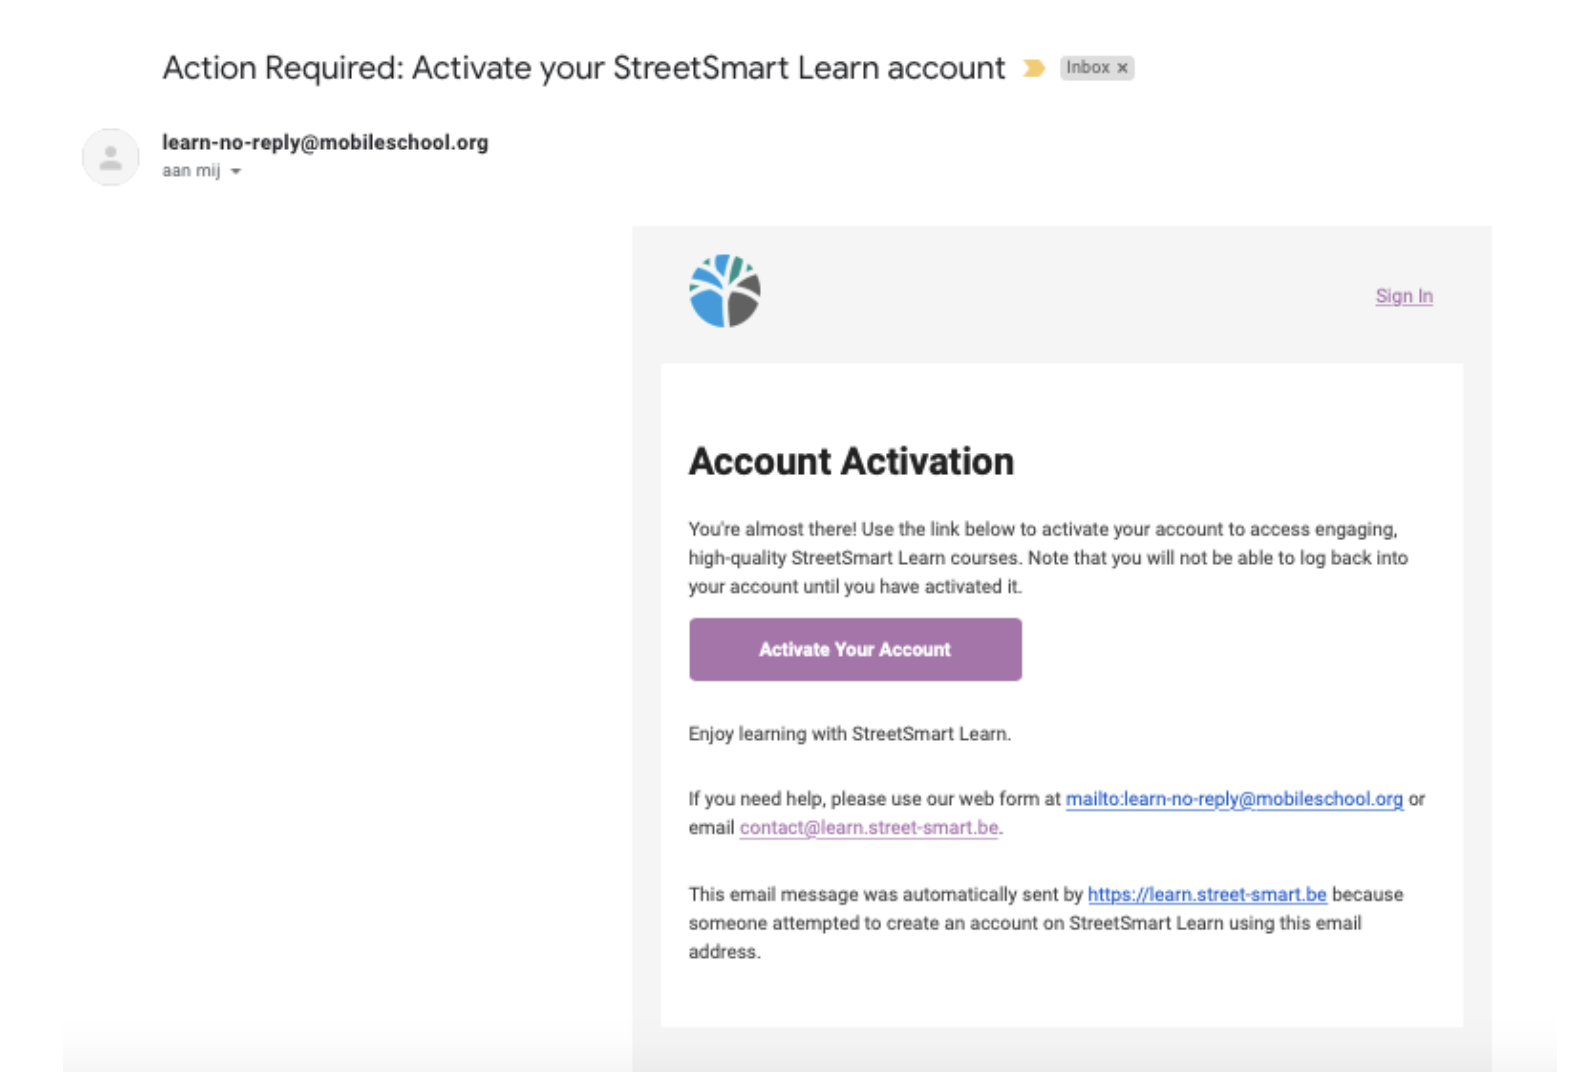
After registering, you will receive a confirmation email to the email address you entered during registration from learn-no-reply@mobileschool.org. Click on the link in the email to confirm your email address.
If you do not see the confirmation email in your email inbox, check the following questions and solutions:
You cannot do this on your own. Please contact us at info@street-smart.be and we will make sure we delete your account.
Yes! StreetSmart Learn is entirely free of charge and is open to everyone who is looking for online training. From teachers to youth workers, from street educators to young leaders...
To change your full name in your StreetSmart Learn account:
No, once a StreetSmart Learn username has been created during registration it cannot be changed.
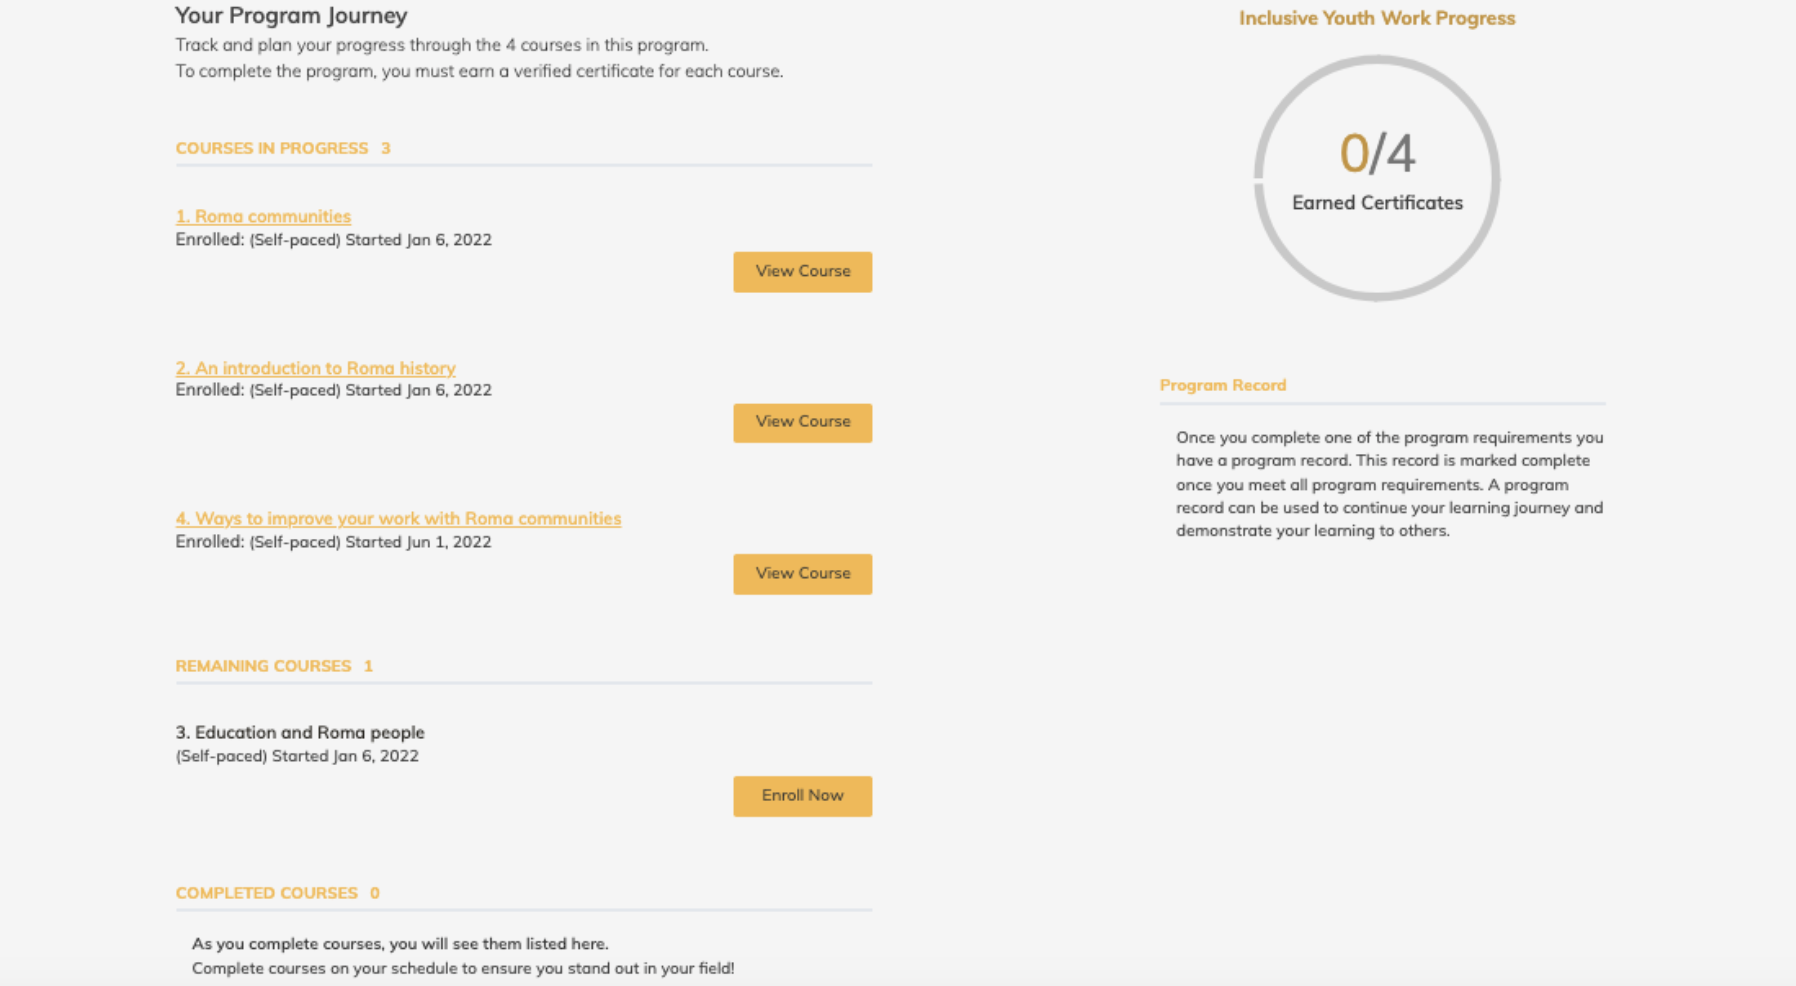
StreetSmart Learn offers training content on several topics. For each of the topics offered, you can find several training programmes. A programme is a longer learning track, constructed from smaller learning units, which we call courses. A course has only one learning objective and takes around 20 minutes to complete. Check out the following example for clarification:
To find a programme of course, you can …
Found a programme or course on StreetSmart Learn you are interested to follow? Make sure to enroll.
StreetSmart Learn uses the principles of microlearning. That’s why programmes are split up into shorter, manageable courses that take around 20 minutes. The estimated duration of each course can be found on the course pages and on the course tiles. The estimated duration of a complete programme is also visible on the programme tiles and on the programme page.
On each course page, there’s an estimated duration of the course. However, there’s no due date to finish the programme or course once you start. This way everyone can progress at their own pace.
There are no restrictions or obligations, you can follow every course separately, but it’s recommended to follow the courses of one programme in sequence. The recommended sequence is displayed on the programme page.
When you arrive at the end of the course, we ask you to share if you would recommend this course. Once completed, you land on the progress page of your course, where you can request a certificate. You can view your certificate by clicking the link.
You can also go to your dashboard and look for the course you just completed. There you can find a link to the related programme. If you click on this related programme, you can check your programme progress and see what courses you already completed, which ones are remaining and which ones are in progress.
We love toThe topics are chosen based on a survey with youth workers worldwide and based on our own expertise. Of course, this is not everything we have. StreetSmart Learn will be expanded with new topics and new programmes in the future. We will also be working with partners to be inspired by their expertise and provide you with the best possible learning materials, so stay tuned! hear from you, so feel free to make suggestions. Please send them to our email address info@street-smart.be.
We love to hear from you, so feel free to make suggestions. Please send them to our email address info@street-smart.be.
The assignments are rated. You need to have 50% or more to be able to receive a certificate for each course.
This is a surprise! You can find the badges you received on your profile on StreetSmart Learn, in the tab ‘Accomplishments’. When you receive your first badge, you will also get a notification on your email address from Badgr (the badge provider).
You receive a certificate when you complete a course and pass the assignments linked to that course (>50%). When you finish all courses of a specific programme, you will also receive a programme completion certificate.
An overview of your achievements can be found on your profile. Open the dropdown menu by clicking on your name and go to your ‘dashboard’ OR to your ‘profile’ to consult your certificates and other achievements.
Lifelong learning is not an unfamiliar concept these days. Here at MobileSchool.org, we are convinced that we should keep expanding our knowledge to keep up with our ever-changing environment. The programmes at StreetSmart Learn will help you improve your daily practice and support you in offering youth work that is impactful and interesting for your target group.
Not everyone can upload content themselves but we do work with partner organisations that create content for StreetSmart Learn. Interested to work with us? Make sure to contact us on info@street-smart.be and let’s talk how we can collaborate.
The decision to use the pronoun ‘he’ was made pragmatically. We obviously want our content to be inclusive, but also accessible to everyone. We want our content to be fluent and easy to read for all learners.
All courses and programmes are available in English, Dutch, French, and Spanish. On the top right corner of the page, you can easily change the language to follow the courses in your preferred language!
Do you have some feedback for us? Please let us know on info@street-smart.be and we’ll make sure to provide you with an answer.
All videos created by StreetSmart are available in four languages: English, French, Spanish and Dutch. The main language of the video is always English, but you can change the subtitles of the videos to the other languages by clicking the CC icon at the bottom of the YouTube video. A red line will appear under the icon when closed captions have been enabled. To change the language, click the gear icon and choose your preferred language.
On the tab ‘Profile’ you can see if you’re sharing a limited of full profile. A limited profile includes only your nickname and, optionally, an image. A full profile consists of, in addition to your username and profile image, information about your full name, your location, your language, a paragraph about yourself, links to your social media accounts.
If you choose to add profile information, course teams and other learners in your courses can view the information you share. Before you can share a full profile, you must specify your date of birth in the ‘Account’ tab.